Multimeter मल्टीमीटर
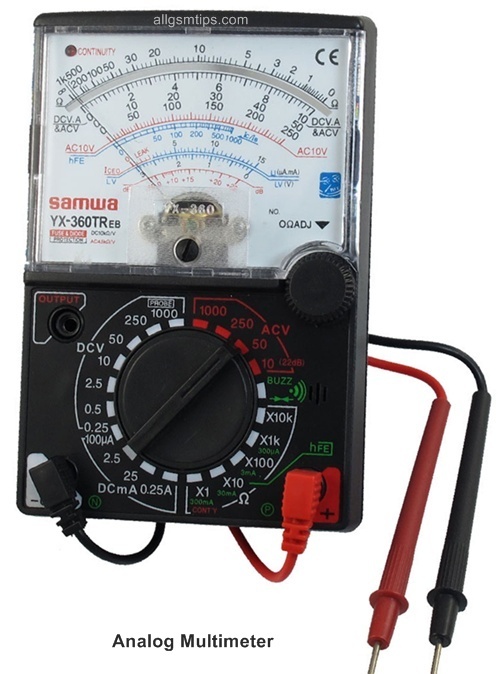
A multimeter or a multitester, also known as a VOM (Volt-Ohm-Milliammeter), is an electronic measuring instrument that combines several measurement functions in one unit. A typical multimeter can measure voltage, current, and resistance. Analog multimeters use a microammeter with a moving pointer to display
How to Use Multimeter in Mobile Phone repairing
मोबाइल फोन की मरम्मत में एक मल्टीमीटर का उपयोग कैसे कर
बाजार में उपलब्ध
multimeters के दो प्रकार के होते हैं ।
1. डिजिटल मल्टीमीटर
2. एनालॉग मल्टीमीटर

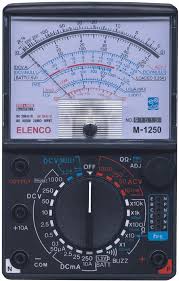
Multimeters are of two types – Analog Multimeter and Digital Multimeter. The only difference is that a digital Multimeter has a digital display of all the readings. An analog Multimeter has a needle-type pointer that moves to a reading while testing any device or electronic component.
आप उन दोनों को एक ही बात करेंगे के रूप में उपरोक्त लोगों के किसी भी प्रकार का उपयोग कर सकते हैं। फर्क सिर्फ इतना है एक डिजिटल एक डिजिटल स्वरूप में रीडिंग दिखा देंगे है । एक अनुरूप एक में है, तो आप अपनी स्क्रीन पर तीर के रूप में प्रति पढ़ने को देखने के लिए होगा । अधिकांश तकनीशियन डिजिटल मॉडल का उपयोग करने के लिए पसंद करते हैं। वे प्यार और उनके लिए एक अलग आकर्षण है जैसे अनुरूप मॉडल, पुरानी पीढ़ी तकनीशियनों द्वारा उपयोग किया जाता है !
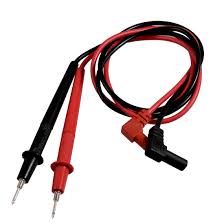
Two probe RED & BLACK, Red probe is positive and Black is Negative.
डिजिटल या एनालॉग एक मल्टीमीटर दो तारों , एक लाल और एक काले रंग की तार है। काला जांच नकारात्मक है, जबकि लाल जांच (+ ) सकारात्मक है । इलेक्ट्रॉनिक्स में, हमेशा लाल सकारात्मक है और काले नकारात्मक है।
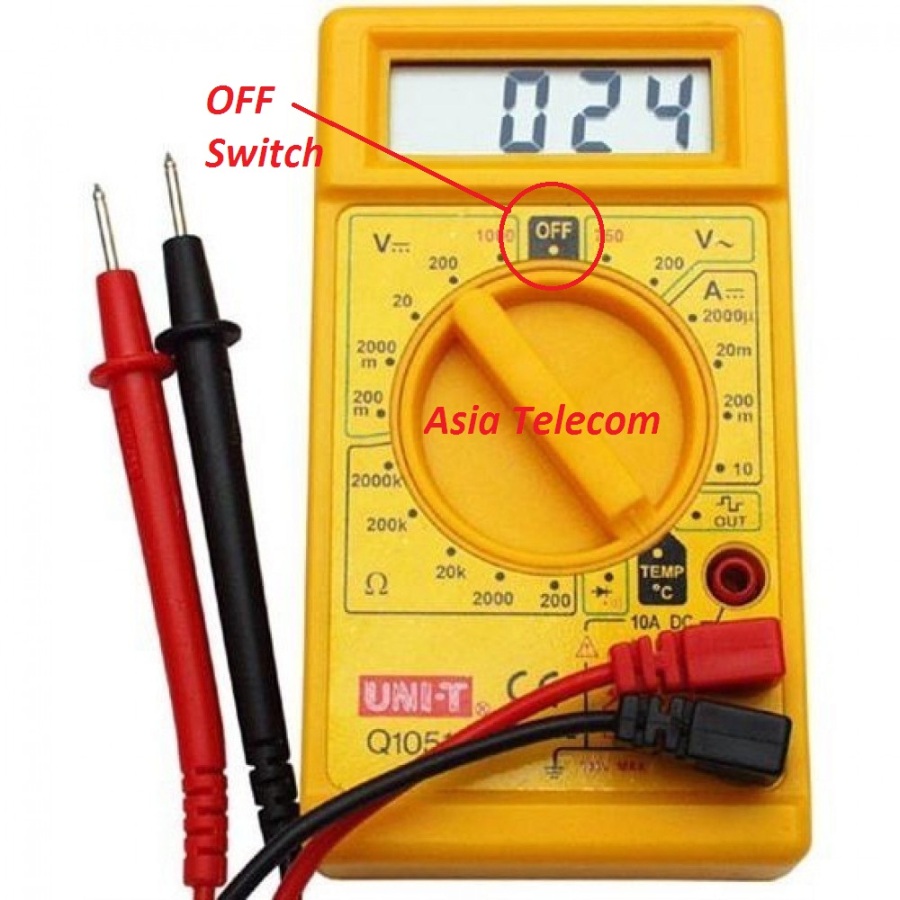
When Buy New Multimeter , Insert Red Probe in VΩmA Slot & Black Probe in COM Slot. 10A & 20A not in use in Mobile Repairing.

आप
एक नया मल्टीमीटर खरीदते हैं, VΩ स्लॉट ( गोल छेद ) में लाल जांच के एक छोर डालें, और COM में काला जांच स्लॉट (means common))
।
3 स्लॉट यानी 10A या 20A सेल फोन की मरम्मत में इस्तेमाल नहीं jata
hai l
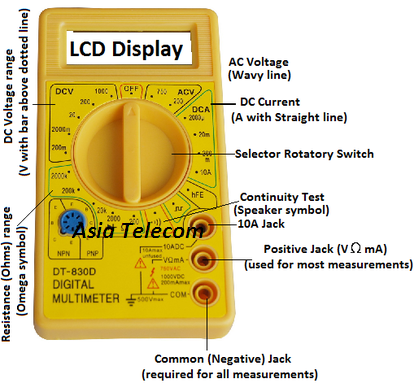
Multimeter Has Following Function
मल्टीमीटर के फंक्शन
Off Button – switch off the multiemeter
Off Button – इसे मल्टीमीटर को बंद करने के लिए यूज़ किया जाता है
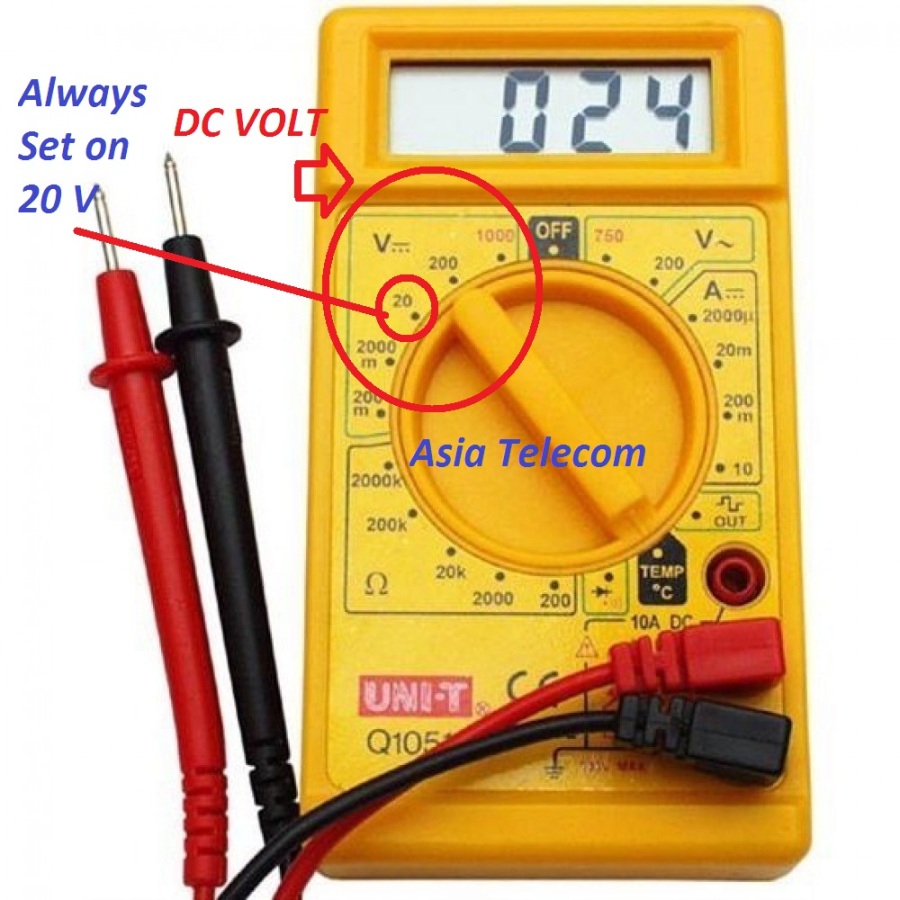
DC Voltage Range – This range is use for measure DC current While Mobile repairing always set on 20V DC.
DC Voltage Range – इस रेंज का यूज़ डीसी करंट को नापने के लिए किया जाता है मोबाइल रिपेयरिंग में हमेशा 20V पर सेट किया जाता है
AC Voltage Range – This range is use for measure AC current.
AC Voltage Range – इस रेंज का उसे एसी वोल्टेज को चेक करने के लिए किया जाता है

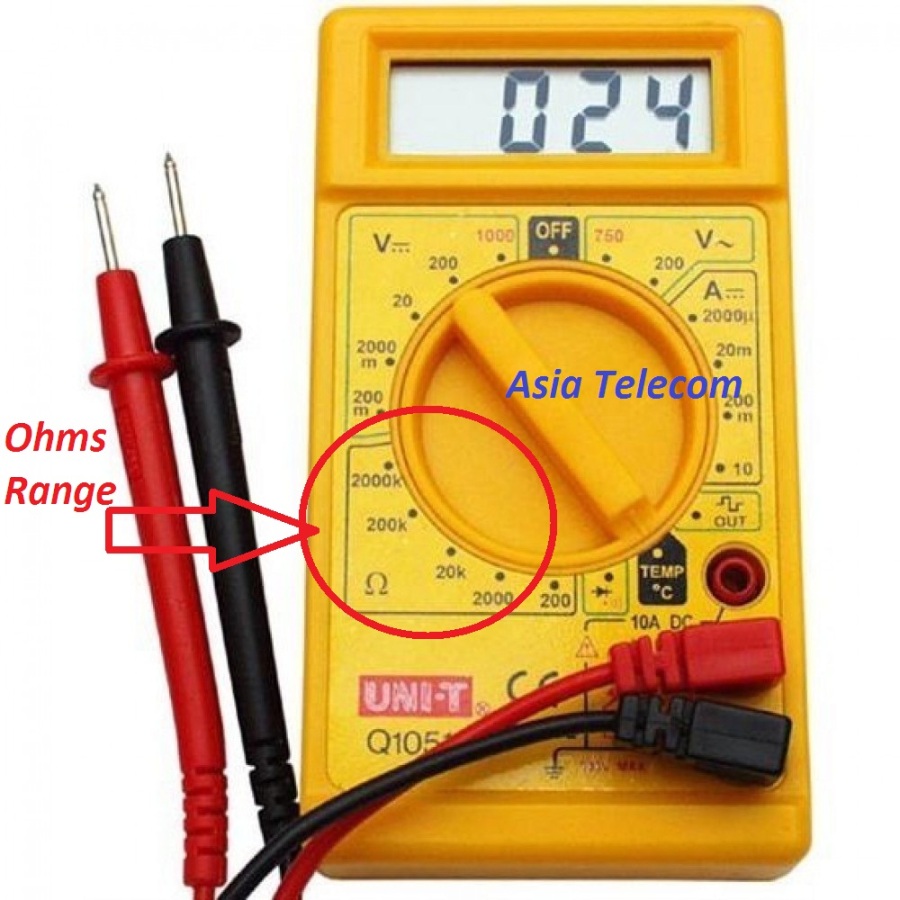
OHMS RANGE – This range is use for measure Resistance value (Ohms)
OHMS RANGE – इस रेंज पर रेजिस्टेंस की वैल्यू चेक करते है
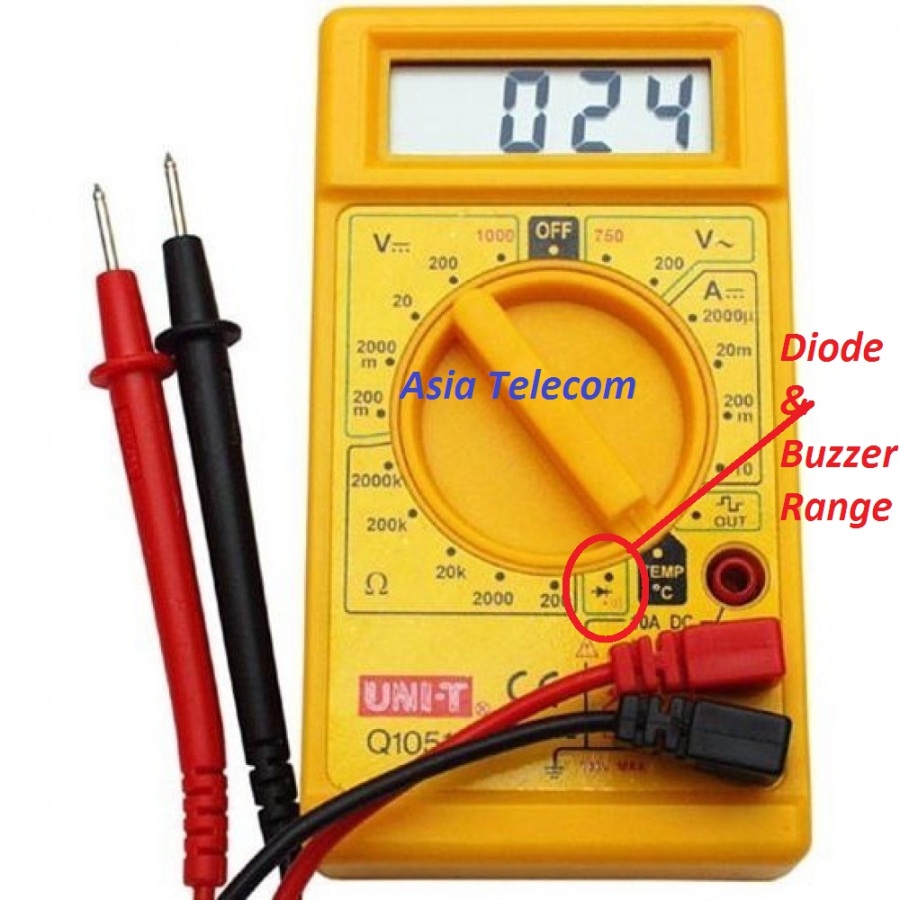
BUZZER & DIODE RANGE – This range is use for measure continuity testing.
OHMS RANGE – इस रेंज पर रेजिस्टेंस की वैल्यू चेक करते है
- Function and Range Switch: This switch is used to select the function and desired range as well as to turn the instrument. In order to extend the life of the battery of the Multimeter, this switch must be kept in the “OFF” position when the instrument is not in use.
- Display or LCD: To display all the readings.
- Common Jack: Plug in connector for black (negative) test lead or probe.
- V ? mA Jack: Plug in connector for red (positive) test lead or probe for all voltage, resistance and current (except 10A) measurements.
- 10A Jack: Plug in connector for red (positive) test lead or probe for 10A measurement.
In Mobile Repairing, We use only following setting
मोबाइल फोन की मरम्मत में , हम केवल मल्टीमीटर में नीचे दिए गए setting के किसी भी एक का उपयोग करें:
DC (Direct Current) Current
- Connect the red probe to “VΩmA Jack” and the black probe to “COM” jack.
- Read voltage on display.

1.
डीसी
वोल्ट
की
स्थापना:
हम चीजों की voltages जाँच करने की जांच करने के लिए इस सेटिंग का उपयोग करें। आदि बैटरी , बैटरी संबंधक , चार्जर, चार्ज कनेक्टर, जैसे विभिन्न चीजों के उत्पादन में वोल्टेज की स्थापना डीसी वोल्ट में जाँच की जा सकती है। यह नीचे 3 डॉट्स के साथ एक capital V और
सीधी रेखा ने संकेत दिया है ।
How to Measure Resistance Using a Multimeter / Resistance Measurement:
- Connect the red probe to “V ? mA Jack” and the black probe to
“COM” jack. - Set the “Range Switch” to desired Ohms (?) position.
- If the resistor to be measured is connected to a circuit then TURN OFF POWER and discharge all capacitors before measurement.
- Connect probes to circuit being measured.
- Read resistance value on display.

2.
प्रतिरोध
की Setting: इस
मीटर तक, आदि प्रतिरोधों जैसे विभिन्न भागों के प्रतिरोध की जाँच की जा सकती है। यह मदरबोर्ड में एक गलती सुधारते समय एक विशेष पढ़ पाने के लिए यह जांच करने के लिए एक सेवा नियमावली में जांच करने के निर्देश दिए है , तो भी हम दो अंक के बीच प्रतिरोध की जांच कर सकते हैं।
सेल फोन में एक अवरोध जाँच करने के लिए कैसे पढ़ें।
How to Measure Diode / Diode Measurement:
- Connect the red Test Lead to “V ? mA Jack” and the black lead to“COM” jack.
- Set the “Range Switch” to diode position.
- Connect Red Test Leads to Anode of the Diode and Black Test Lead to Cathode.
- The forward voltage drop in mV will be displayed in the screen or display. If the diode is reversed, figure “1” will be displayed.
3. निरंतरता Continuity:

यह भी डायोड सेटिंग कहा जाता है। इस सेटिंग पर मल्टीमीटर रखते हुए, हम दिए दो बिंदुओं के बीच निरंतरता की जांच कर सकते हैं। पटरियों खुले हैं या नहीं हम जांच कर सकते हैं । मल्टीमीटर निरंतरता से पता चलता है, यह एक बीप साउंड दे देंगे। ट्रैक है कि ठीक है कि इसका मतलब यह होगा। यह बीप नहीं करता है तो और, यह ट्रैक टूट गया है कि इसका मतलब यह होगा। एक टूटे हुए ट्रैक की मरम्मत करने के लिए, सभी तकनीशियनों जम्परों बनाते हैं। Jumpering दूसरे छोर से एक टूटे हुए ट्रैक के एक छोर से एक पतली अछूता तार टांका लगाने का मतलब है
इस सेटिंग के साथ, हम बैटरी कनेक्टर के सकारात्मक और नकारात्मक टर्मिनलों पर तारों रखकर shorting जाँच और भी तारों को उल्टा । हम दोनों तरीकों से ध्वनि बीप मिलता है, तो हम केवल एक बार बीप साउंड मिलता है
सेल फोन के कुछ मॉडलों में, आप बीप साउंड नहीं सुना होगा। इसके बजाय आप 2 बार पढ़ने देखते हैं तो मल्टीमीटर की स्क्रीन पर या सिर्फ 1. (255 , 282 , आदि की तरह ) तो भी जांच के पीछे के बाद , तो सर्किट बोर्ड कम है यानी कुछ पढ़ने देखेंगे या तो । आप एक समय और अन्य समय पर सिर्फ एक पढ़ने मिल जाना चाहिए।
Packing List or Items that come with a New Multimeter:
- Multimeter.
- Set or red and black test leads or probes.
- Battery.
- Thermoelectric couple.
- Operator Instruction Manual
Other Multimeter use :
How to Measure AC (Alternating Current) Voltage Using a Multimeter / AC Voltage Measurement:


- Connect the red Test Lead to “V ? mA Jack” and the black lead to“COM” jack.
- Set the “Range Switch” to desired AC V position.
- Connect Test Leads to device, electronic component or circuit being measured.
- Voltage value will appear on the Digital or Analog Display the Multimeter.
How to Measure Transistor hFE / Diode Measurement:

- Set the “Range Switch” to hFEposition.leads into the proper holes of the hFE Socket on the Front Panel of the Multimeter.
- The Multimeter will display the approximate hFE value at the condition of base current 10 µA and VCD 2.8V.
How to Measure Continuity / Audible Buzzer Continuity measurement:

- Connect the red Test Lead to “V ? mA Jack” and the black lead to “COM” jack.
- Set the “Range Switch” to Buzzer.
- Connect test leads to the two points to be tested. If the resistance is lower than 100 Ohm then there will be buzzer sound which means that continuity is OK.
Test Signal Use:
- Set the “Range Switch” to Signal Symbol.
- A test signal appears between “V ? mA Jack” and “COM” jacks. The output voltage is approx 5V p–p with 50 k ohm impedance.
How to Measure Temperature / Temperature Measurement:
- Connect the k-type thermoelectric couple to “V ? mA Jack” and “COM” jacks.
- Set the “Range Switch” to “Temperature Position”.
- The display will read the temperature value in Celsius or Fahrenheit.
How to Measure Room Temperature / Room Temperature Measurement:
Most Multimeters can easily measure room temperature from 0 to 35 degree Celsius. Just set the “Range Switch” to RT Position and the present room temperature will be displayed.
Warning:
- To avoid electrical shock, hazard or damage, do not measure voltage exceeding 1000V or 750V above earth ground. Different Multimeters may have different measurement range. Read the instruction manual carefully before operating the Multimeter.
- Before using the Multimeter, inspect Test Leads, Connectors and Probes for cracks, breaks or crazes in the insulation.
- Before attempting to open the case of the Multimeter, be sure to disconnect test leads or probes from any energized electronic circuit to avoid electrical shock.
How to Take Care of your Multimeter
When you are using a Multimeter, it is your responsibility to its proper care and prevent it from any damage:
- Replacing Fuse: Fuse of a Multimeter rarely blow or need replacement. If it happens, it is because of operator error or mistake. If required just replace the old fuse with a new one with proper polarity.
- Battery Replacement: If the symbol of battery appears on the display, it indicates that the battery has to be replaced.
Asia Telecom
Mobile Training Institute
Call - 9644139972
Jabalpur- Madhya Pradesh
Get Admission Now


